Sunday, March 24, 2013

Apple Cozy Crochet Pattern

In my previous post about my apple cozy, I explained that I had tried several different patterns. I wasn't happy with any of them so I decided to make my own! 

This is the finished product!
The pattern is pretty simple. With basic knowledge of a few common crochet stitches, (or a quick google or youtube search to learn them) you will be well on your way to having cozier apples!!

Terminology 
  • ch - Chain
  • sc - Single Crochet
  • invdec - Invisible decrease (you can use sc2tog as your decrease stitch if you prefer but the invdec makes a lot cleaner looking finished product)
  • sl st - Slip Stitch
  • st/sts - Stitch/Stitches
  • FO - Finish Off
Supplies Needed
  • A small amount of worsted weight yarn in one color (I used the color Cherry Red of Red Heart Super Savers Yarn)
  • H 5.00 mm crochet hook (or whatever hook your yarn instructs you to use. The yarn I used suggested the I 5.50 mm hook but I used the H hook to make slightly smaller and tighter stitches)
  • Stitch markers 
  • A yarn needle for weaving in the ends of the yarn
Notes
  • This pattern is a continuous spiral crocheted in a circle. I recommend using a stitch marker to mark the beginning of each round (this prevents you from pulling out your hair when you loose your spot!!). As you begin to crochet each round, keep moving the stitch marker up so that you keep track of where you are.
  • At the end of each round's instructions, the total number of stitches you should have in that round is listed in parenthesis.
  • As you continue to add more rows, you may have to tighten the magic ring a few more times because it may loosen.
  • For this entire pattern, crochet into and pick up both loops of a chain or stitch.

Apple Cozy Crochet Pattern

(Note: The following pattern has pictures with written directions. Scroll all the way down for written directions only)

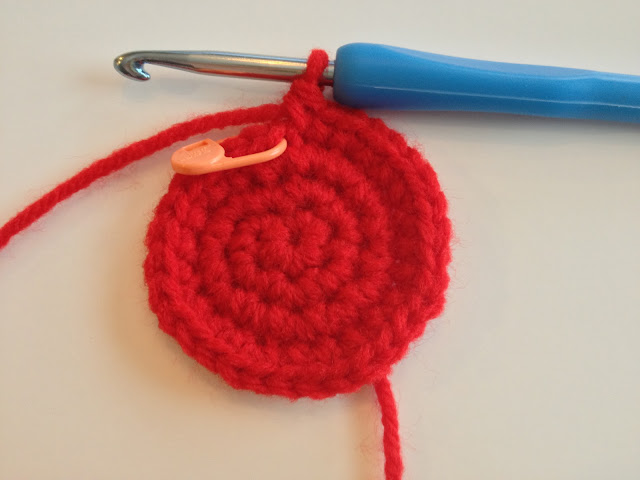
- Make a magic ring, and ch 1 (this ch does not count as a st)


- Round 1: 6 sc in magic ring (6 sts)
Slightly tighten the magic ring. Do not tighten the magic ring completely or the next row will be very difficult to crochet.


- Round 2: 2 sc in each st all the way around (12 sts)
Tighten the magic ring completely.


- Round 3: 2 sc in each st all the way around (24 sts)


- Round 4:  [2 sc in next st, 1 sc in next st, 1 sc in next st] repeat [] all the way around (32 sts)


- Round 5 and 6: 1 sc in each st all the way around (32 sts)


- Round 7: [2 sc in next st, 1 sc in next st, 1 sc in next st, 1 sc in next st] repeat [] all the way around (40 sts)


- Round 8-13: 1 sc in each st all the way around (40 sts)


- Round 14: [invdec, 1 sc in next st, 1 sc in next st] repeat [] all the way around (30 sts)


- Round 15 and 16: 1 sc in each st all the way around (30 sts)


- Sl st in the next stitch then FO and weave in all the ends

I felt like the finished apple cozy was a little too plain, so I made some leaves for the top edge of the cozy. Here is the pattern for them!

Apple Cozy Crochet Pattern (Written Directions Only)
- Make a magic ring, and ch 1 (this ch does not count as a st)
- Round 1: 6 sc in magic ring (6 sts)
Slightly tighten the magic ring. Do not tighten the magic ring completely or the next row will be very difficult to crochet.
- Round 2: 2 sc in each st all the way around (12 sts)
Tighten the magic ring completely.
- Round 3: 2 sc in each st all the way around (24 sts)
- Round 4:  [2 sc in next st, 1 sc in next st, 1 sc in next st] repeat [] all the way around (32 sts)
- Round 5: 1 sc in each st all the way around (32 sts)
- Round 6: 1 sc in each st all the way around (32 sts)
- Round 7: [2 sc in next st, 1 sc in next st, 1 sc in next st, 1 sc in next st] repeat [] all the way around (40 sts)
- Round 8-13: 1 sc in each st all the way around (40 sts)
Round 14: [invdec, 1 sc in next st, 1 sc in next st] repeat [] all the way around (30 sts)
- Round 15: 1 sc in each st all the way around (30 sts)
- Round 16: 1 sc in each st all the way around (30 sts)
Sl st in the next stitch then FO and weave in all the ends


This is my first pattern I have ever written so if you have any questions, or if something doesn't make sense, feel free to ask!! 

Small Leaf Crochet Pattern

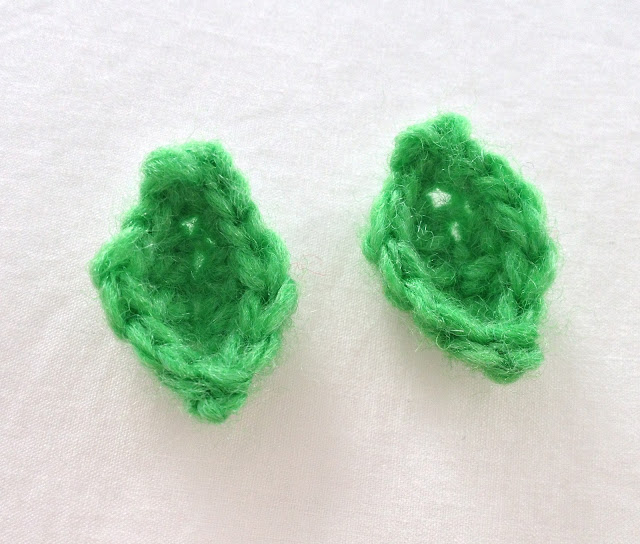
This is a crochet pattern for a small leaf I created to add some detail to my apple cozy pattern.

The finished product!
Terminology
  • ch - Chain
  • sl st - Slip Stitch
  • sc - Single Crochet
  • dc - Double Crochet
  • FO - Finish Off
Supplies Needed
  • A small amount of Lion Brand Yarn Bonbon Yarn in one color (or any light weight, 3 ply yarn. I used the light green bonbon yarn in brights set)
  • E 3.50 mm crochet hook (or whatever hook your yarn suggests you use)
  • A yarn needle for weaving in the ends of the yarn

Small Leaf Crochet Pattern

(Note: The following pattern has pictures with written directions. Scroll all the way down for written directions only)

- ch 7


- In the second ch from the hook, sl st in the back loop only


- sc in next ch back loop only


- dc in next two chs back loop only


- sc in next ch back loop only


- sl st in next ch back loop only


Rotate the leaf clockwise so that the unworked front loops you didn't pick up from the initial chains are facing up.
- sl st in next ch


- sc in next ch


- dc in next two chs


- sc in next ch


- sl st in next ch


- FO and weave in ends

Small Leaf Crochet Pattern (Written Directions Only)

- ch 7
- In the second ch from the hook, sl st in the back loop only
- sc in next ch back loop only
- dc in next two chs back loop only
- sc in next ch back loop only
- sl st in next ch back loop only
- Rotate the leaf clockwise so that the unworked front loops you didn't pick up from the initial chains are facing up.
- sl st in next ch
- sc in next ch
- dc in next two chs
- sc in next ch
- sl st in next ch
- FO and weave in ends

If something about this pattern doesn't make sense, or you have any questions, feel free to ask!

Sunday, February 17, 2013

Crocheted Dog Blankets

My brother and his wife have the most precious dog named Murphy. Murphy enjoys blankets a lot and will snuggle and crawl under them to sleep all the time, so I wanted to crochet him a blanket for Christmas! 

I did some research before deciding how I wanted to make the blanket because, I wanted to use a stitch that was tight and didn't easily separate so that Murphy couldn't get his nails caught in the blanket. I found some patterns using the back-post double crochet and the front-post double crochet that created a basket weave affect that was really neat looking. It created a pattern and blanket that held together very tightly and was even kind of cushy, which was exactly what I wanted!

This is the finished blanket!
 And this is a close-up of the stitch. You can see the basket weave affect that the stitch creates
The blanket was quite a hit with Murphy...

My dad's cousin was visiting my brother and his wife for Christmas, and when she saw the blanket I had made for Murphy she really liked it and wanted one for her puppy! So after Christmas settled down, I started on another slightly smaller blanket for her, that I just finished. 

Here is the second dog blanket! 
And the stitch up-close again...
I love the way both of these blankets turned out! I am working on getting this pattern written down correctly so that I can put the pattern up on my blog!

I hope all of your puppies are staying warm this winter...

Tuesday, January 22, 2013

Christmas Presents: Apple Cozy

My brother, Jason, and his wife, Kaylin, came to visit my family this Thanksgiving. While they were here, we began our Christmas scheming of figuring out who wanted what for Christmas. Jason told me that Kaylin was wanting an apple cozy. I had never heard of these before, but after going to Etsy and doing a search for apple cozies, I was not only loving how cute they were, I was trying to figure out how I could make one!! An apple cozy is a crocheted or knitted cover for an apple that protects the apple, so you can toss it into your purse, lunchbox, or bag and not worry about bruising the apple. I found a couple apple cozy patterns online and tried them but they just weren't quite what I had pictured in my head so I decided to create my own pattern. After a several attempts, I got what I was looking for!


I loved how it turned out, but it was a bit plain... it needed some kind of decoration. So next I came up with these!


And once I attached them, it was the last piece my apple cozy needed.


I can't get over how cute it turned out!! I was a bit worried that it wouldn't be the right size to fit your basic apple because I had a rather small apple I was using as my model, but Kaylin said it fit perfectly. 

I am working on getting this pattern, as well as a couple other patterns I came up with recently, written out correctly. My apple cozy was really easy to make and fun too, so stay tuned for the pattern for this and more!!

Sunday, January 13, 2013

Christmas Presents: Lego Man


My next couple blog postings will be focused on the Christmas presents I made this year which is what has mainly filled my past couple months! I am so happy with the way everything I made this year turned out and I am very excited to blog about all of them.

Probably my favorite Christmas present I made this year turned out to be the Lego man I made as a cute/funny gift for my boyfriend. There is something about Legos that I think no guy every fully outgrows! I had been scrolling through a collection of crochet patterns and this pattern caught my eye. The blog posting I stumbled upon had this Pattern for an Amigurumi Crochet Lego Man. It was a pretty easy pattern to follow and I am very happy with how the Lego man turned out (I almost didn't want to give him away)


He turned out so, so adorable! Like the pattern says, I attached the arms using safety eyes so that the arms are posable, which was such a clever idea.
I love how the top of the head looks so much like a real Lego head!
His little chubby legs are so cute...
I followed the pattern exactly except for two things. Once I stitched together the torso, I ended up turning it inside out because I felt like the back of the pieces looked cleaner than the front, because on the front, you could see the stitches holding the pieces together. The second thing I changed slightly was the hip section. She said in her pattern that the hip section seemed slightly small on her finished project and because I had turned the torso section inside out, it was very small on mine as well. So for the hip section I added an extra increase row for the width as well as five extra rows for the length, and that worked out perfectly!

I am going to be making a little baseball cap for him soon and I will share my pattern for that once I figure it out. This little Christmas present was so much fun to make (even though it took a bit longer than I expected) however, I already want to make another one!!! 


Tuesday, January 8, 2013

New Year, New Blog, New Projects!

I don't know how it happened, but it's 2013! 2012 seemed like a very long year, but looking back now it seems like it is gone in a flash.

Towards the end of last year we rearranged one of our guest rooms allowing me the space to turn it into a craft room. Getting everything organized in my new room inspired me to make things (it was either the organizing that inspired me or the space to actually be creative)! And as several of my family members can tell you, I made a lot of handmade presents this year for Christmas. November and December where very busy months for me as I got all my ideas for all the awesome presents wayyyyyy too late!! Because I was frantically making these things, and they were Christmas surprises, I wasn't able to blog about them. I made sure however, to take lots of pictures along the way knowing I could share them later. I guess you could say my New Year's resolution this year is to start blogging about all my creations! 

So I wish you all a very happy 2013 and I hope you will enjoy following me as I, well, Make All The Things!!